Points To Revit Floor Object

Linking Revit Models By Shared Coordinates Coordinates Revit Architecture Autodesk Revit

Tutorial Edit Section Heads And Tails Bement Tutorial Object

Revit Shortcuts Revit Tutorial Revit Tutorial Architecture Revit Architecture

Understand Phasing Topography And Design In Autodesk Revit Revit Architecture Revit Tutorial Autodesk Revit

Revit Mep Best Practices Modelical

Revit Architecture 2011 Tutorial Creating Radial Arrays Revit Architecture Architecture Tutorial
I then go after in this case the structural system.
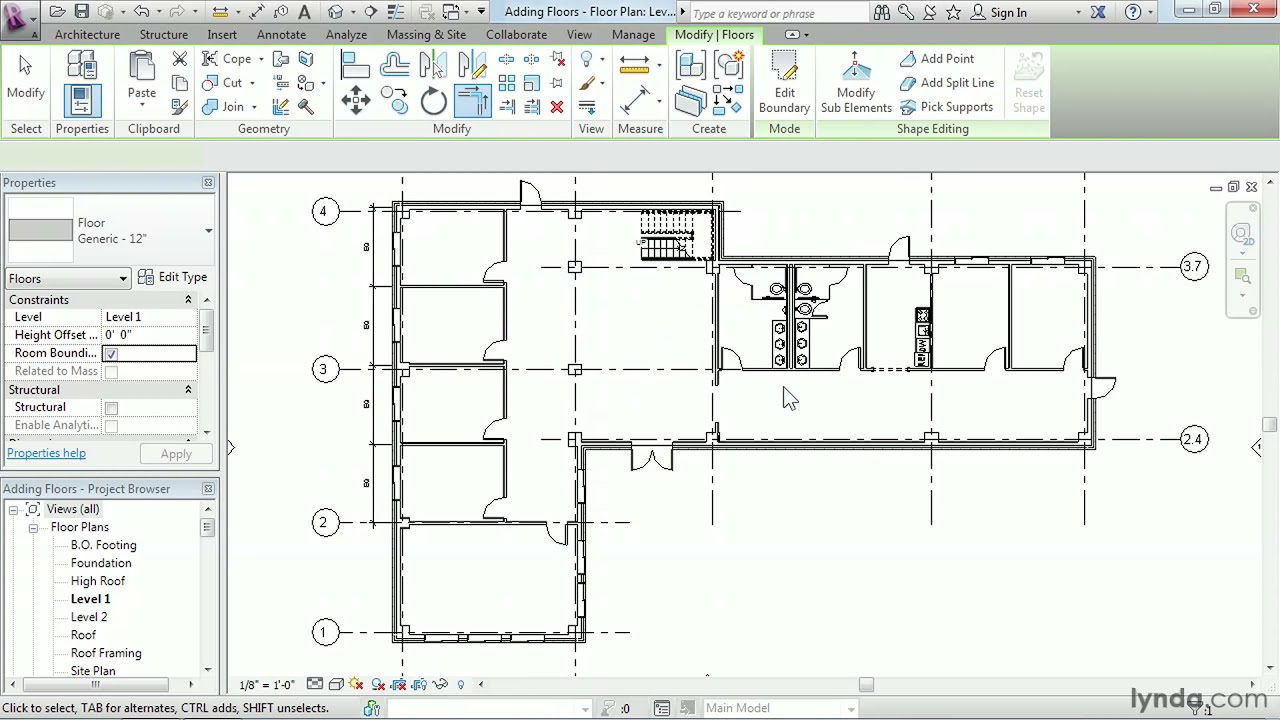
Points to revit floor object. As soon as you place the point revit resolves the new surface by triangulating it. You can use the add point tool to add singular points to the element geometry. The first step is to create a floor in the area needed. Click modify floors tabshape editing paneladd point.
There are many ways to generate a toposurface both inside and outside of revit. If we switch to a 3d view it is far easier to see what is going on. Creating points in revit. I typically start with the easier items first.
The elevation edit box displays on the options bar with a relative check box next to it. After tpc is installed we will launch the program. Demonstrates how to insert a point cloud data file in revit and identifies some of the tools that can be used to work with this data. Walls floor and ceiling.
Enable object snaps to more easily align a placed element or sketched line with existing geometry. Place your point where you want it you can place multiple points and hit esc to exit. Complete 16h revit beginner course. You may wish to turn off snap to remote objects in your revit snaps these can get in the way when working with scan to bim and point clouds generally to facilitate setting of a workplane based on already modelled geometry i made a simple 3 point adaptive component with a surface formed by these 3 points.
The next option is over families after clicking this button you will have to select an object after selecting it it will open up in in the editor. With the point s elevation set go ahead and click in the active view to place the point. Click manage tabsettings panel snaps. Revit point creation how to.
Here is the completed model in revit. The trusses were modeled once and then copied and pasted. In the snaps dialog do one of the following. You can envisage that.
Using pointsense for revit there is now a way to create a surface directly from geometry generated from the point cloud data. To enable snaps clear snaps off and define other settings as desired to specify snap increments and disable selected object snaps. The below guide shows how this can be done. Select the floor or roof to modify.
Make sure you place it within the boundary of the floor element. The advantage of having the cut sections from the registered point cloud is that you have a template to follow.

Revit To Indesign Indesign Diagram Image

Pin On Revit Bim World

Revit Tip Applying Skirting And Floor Finishes Floor Finishes It Is Finished Flooring
Revit Architecture How To Work With Floors Lynda Com Tutorial Youtube

Topography In Revit With Images Topography Civil Engineering Software Survey Data

Revit Project Templates Provide A Beginning Environment And Standards For New Projects And Proj Building Information Modeling Revit Architecture Revit Tutorial

Floor Plans In N4ce From Point Clouds Point Cloud Floor Plans Clouds

Pin On Tips Tricks In Revit

Ghim Tren Dynamo Revit

For Any Randomly Picked Building Construction Project It Is The Structural Engi Structural Engineering Building Information Modeling Architectural Engineering

Hardwood Floors Prefinished Hardwood Flooring Mirage Floors Building Information Modeling Revit Tutorial Revit Architecture

Practical Dynamo Following Topography Therevitkid Com Tutorials Tips Products And Informat Building Information Modeling Topography Parametric Design

Free Elk Toolbox For Autodesk Revit Autodesk Revit Tool Box Revit Software

